 |
USB to UART, (CP2102 module)Look for a green or blue-coloured circuit board with a USB connector at one end and 6 pins at the other end. This device enables your desktop or laptop machine to communicate with the Shrimp, for example to send new programs to it with the free Arduino IDE, or to exchange other information with a program when it’s running on the Shrimp. For the latest Baite CP2102 modules, (with DTR as sixth pin on the front) attach the rainbow wires from the 9pin header to the CP2102’s labelled pins like…
For older Baite CP2102 modules (with DTR pin labelled on the back) exchange TX and RX to be like…
|
Makers of Morecambe
Thanks ![]() (vector graphics), Sky Bowman (patient daughter).
(vector graphics), Sky Bowman (patient daughter).
Administered by Cefn Hoile using Retro-fitted.

This device is so awesome it solved all of my problems of finding an affordable development board and I plan on making one. I found this site on Hack-A-Day!
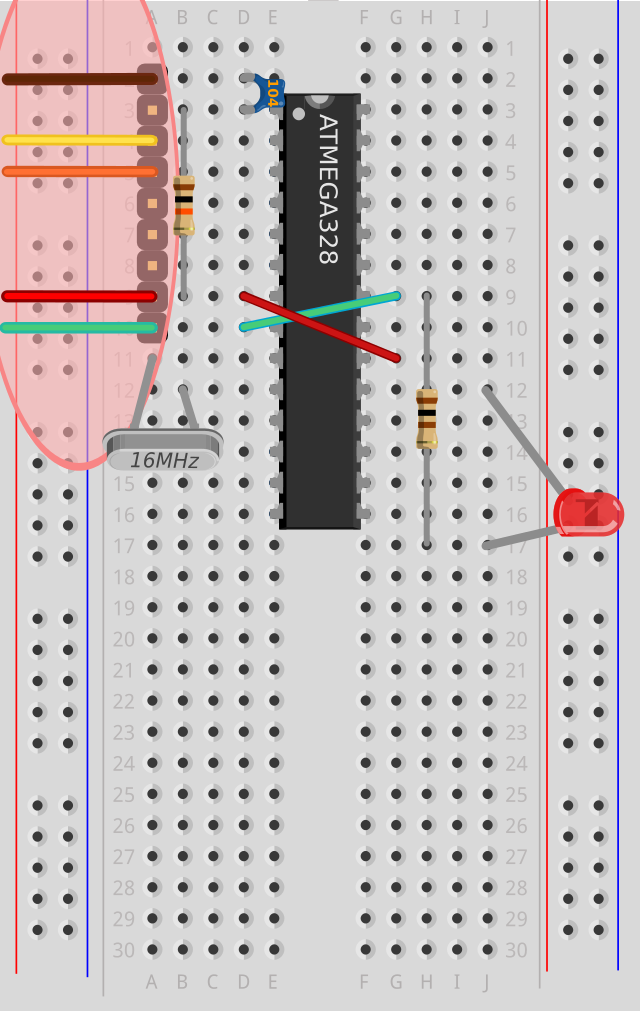
does the crystal not need any power?
The crystal does the same job for the ‘clockwork’ of the computer as a pendulum does for a clock. In other words it resonates. The way this wobble is triggered and maintained is a bit like feedback between a microphone and a speaker – through amplifying its own output, with any random noise starting off the frequency. On this model, you’ll understand that the oscillation is fed by power from an amplifier circuit built in to the microcontroller.
What should the “Arduino Programmer” be set to? I see options: AVR ISP, AVRISP mkII, USBtinyISP, USBasp, Parallel Programmer & Arduino as ISP.
This setting is misleading and can be ignored where you are not using a programmer. Instead, if following our instructions, you are sending a HEX file containing the program over a serial connection in the tiny window which the Arduino bootloader waits for a new program after the Reset signal is received. That’s the standard model of programming any Arduino Uno, and we are duplicating this in our build.
avrdude: stk500_getsync(): not in sync: resp=0x00
I keep getting the above error at step 12 any tips?
I’m sorry to say that’s a really generic error.
You’ll discover that the same error occurs if you haven’t attached anything at all to the other end of the USB module! It simply means that the PC isn’t getting the response it expects over serial from its attempt to reprogram the device. In blunt terms it means there’s something wrong in the layout – the wrong capacitor in the wrong place, one wire placed one row out. Usually scanning it again, double checking which way up the chip is, and generally verifying the positions of everything and there will be an aha moment when you realise the power isn’t attached, or something
Is this one of our kits or parts you’ve sourced yourself? In any case if you’re stuck, send us fairly high-res, well-lit pictures from one or two different angles (preferably one angle in plan view like our diagram) then we’re happy to diagnose. I’ve personally workshopped many, many hundreds of these builds, so I can normally spot things in a few seconds.
I got this, and checked my circuit several times, but everything seemed OK. Then I checked the AVR chip itself. I had bought my own components and inadvertently ordered a chip without a “bootloader”, so the Arduino IDE did not recognize it as a Uno.
If this is your problem, then its easy enough (although often a bit more costly) to get the chip pre-programmed with the bootloader, or you can go the hacker route and build your own ISP (bootloader programmer). I followed the instructions at http://learn.adafruit.com/arduino-tips-tricks-and-techniques/arduinoisp and can now buy the cheaper, unprogrammed AVR chips in bulk and put whatever bootloader I like,
Good work, Frank. Also if you want to look into other ways of supplying parts and flashing them, there’s information about using Optiloader at http://shrimping.it/blog/bill-of-materials/ under the heading “Getting your first Shrimp working”.
[…] Build a Shrimp, in this step-by-step, illustrated guide, it shows you how to build an Arduino-compatible Shrimp from scratch, and upload your first code to control it. […]
[…] started building my shrimp by gathering the components and following the steps in the "blink" example. This takes you all the way through building a shrimp on a breadboard, programming it and running […]
I have got to step 12 of blink and haven’t managed to get it blinking. I’m fairly certain everything is wired correctly and all the components are in the right place.
I have downloaded the CP2102 installers for windows 8 from your website.
When I tried to upload the blink programme from Arduino it says ‘Serial port “com 1″ not found.’ I checked the serial port in ‘tools’ but it was greyed out and I can’t select it.
I may be wrong but I think that somehow I haven’t installed the drivers properly. I checked the USB in my PCs device manager and tried to update the device driver, but when I browsed for it in my computer it says it can’t find the driver software.
Do you have any suggestions about what I’m doing wrong?
You’re definitely right that if you don’t have a COM port appearing and ticked in the Arduino IDE, then no amount of good circuitry will help you. If Serial Ports are greyed out, then either you don’t have permissions to access them (this happens on Linux, and could potentially happen on restricted Windows installs as found in enterprises or schools) or the drivers haven’t been installed fully yet. Are you using the CP2102s which we supply? Others have definitely succeeded with the Windows 8 drivers from Silabs. They originate from http://www.silabs.com/products/mcu/pages/usbtouartbridgevcpdrivers.aspx where you may find more instructions. Did you try turning it off and on again?
Thanks for your reply. I have downloaded the CP2102 installers from your website and from Silabs but still can’t get blink to work. When I download the installers I only get the option to ‘open’ or ‘save’ – there is no option to ‘install’. Am I misunderstanding something?
Hi, Martin. Hope this doesn’t sound dismissive, but following the guidance at http://www.chiark.greenend.org.uk/~sgtatham/bugs.html is really useful to us. Saying ‘can’t get Blink to work’ doesn’t give us an idea of what state your system is currently in. Does that mean that you’ve successfully made the UART appear and ticked it in Arduino IDE, and that perhaps an error is reported when uploading it to the Shrimp, or something else? The Silab drivers are programs you should download and then execute (Windows might call this ‘Run’ or ‘Open’) in order to install the drivers. It should walk you through a wizard-style installation, possibly needing your account to have Administrative privileges then after a restart and plugging in the CP2102 you should see a new COM port appearing in the Arduino IDE. As a sanity check, the same COM port should disappear after you unplug it. If you’ve got this far, then we can take a look at photos of your circuit to check the wiring.
Hi there, just got my USB to serial through, but it doesn’t have a DTR pin. It does however have an RST, being a total noob I thought I’d ask – have a bought the wrong adapter, or will this one work?
Thanks
Ross
Ordinarily, RST on these boards is not intended to be attached to Reset on an ATMEGA. Rather it is the reset pin for the CP2102 chip (it’s intended to receive a signal to reset the UART module itself). There may be a RTS (ready to send; note the order of these letters) or DTR (Device Transmit Ready) pin broken out in some way, but the pin is definitely there. Some people use a tiny tip soldering iron to attach direct to the surface mount chip! Did you check to see if there’s a DTR pad on the back which you can solder to? By all means send us an image by email and we’ll take a look how you can recover. Take a look at the note at http://shrimping.it/blog/bill-of-materials/#comment-55 in case you can workaround your problem. See ‘Programmer Kit’ at http://shrimping.it/blog/kits/ for prices if you want us to send you one of the ones we’ve tested.
So, what do I do if I didn’t buy a pre- bootloaded atmega 328p?
Hi, Marl. Thanks for the question. You can find a bootloading walkthrough when sourcing your own Shrimp parts (included unbootloaded ATMEGA chips, which save you some money) at http://shrimping.it/blog/bill-of-materials/ under the heading “Getting your first Shrimp working”. Hopefully Optiloader will do the trick for you.
You need one chip which is already bootloaded to begin with in order to run Optiloader (or an official Arduino board). You can get in touch with us and we’ll mail out a prepared Shrimp kit if you need it. See http://shrimping.it/blog/kits for the pre-bagged kits available.
If you have a Raspberry PI, and you’re a bit technical, it’s now feasible (though bleeding edge) to bootload chips directly with python using SPI support. We’re working with @whaleygeek to test this approach. Get in touch with him if you’re desperate to solve the problem today, and have a Raspberry PI to hand (and some wires